


How Nouns avatars were built in VRM
The artistic and technical processes for generating VRM avatars from Nouns PFP collection
Nouns is an engaging PFP NFT project based on pixel-based characters, a cool collection residing on the Ethereum blockchain.
Our role as a 3D creative studio centers on crafting interoperable VRM avatars derived from the Nouns 2D PFP collection. This enriches the functionality of NFTs, granting token owners the opportunity to use a 3D avatar in virtual worlds. Both 2D PFP and their corresponding avatars are available on VIPE, our interoperable avatars' marketplace.
Based on previous work on 3D models and textures done by another development team, we have generated VRM format avatars for each Nouns collection token. Thanks to their open-source project, it enabled us to transform the GLB bases into VRM avatars with blend shapes and utility across the metaverse.
Our focus will be on various artistic and technical processes, including workflow conversion, material and texture optimization, rigging and blend shapes. We'll also delve into the configuration of the Blender assembler and automation and code optimization.
Let's start!
Resources
Nouns avatar collection in VRM
The first thing to do when we have collections already created like this one is to analyze what content we have to generate in order to understand what we need to adapt. As this collection had 3D resources made already, the art style was locked quicker, and we could focus on other key elements.
To create a generative PFP as 3D VRM interoperable avatars, we follow a basic workflow consisting of:
- Counting the traits and setting a technical budget for each type of art piece. Geometry, texture and material technical boundaries are set.
- Preparing an atlas to know which UV region belongs to which trait. We have to take into account the limit of materials we have.
- Knowing the number of texture traits and creating the textures in each UV region.
- Creating a rig.
- Creating a generation scene.
- Generating avatars and textures.
Note: Nouns were in GLB format. Using a code that went through all the GLB files, we extracted each texture and exported it as FBX to be able to work in Maya.
Workflow and collection adaptations
The Nouns did not follow some parts of the original workflow. The first challenge was to find a way to optimize the number of materials and textures used, as well as the organization of the rig.
Each Noun was made up of four traits and five materials that could be optimized:
- Accessories
- Body
- Glasses
- Pants
- Shoes
Rig
We separated the traits by geometry. The Nouns always have the same body, but the geometry of their heads changes, so we have to separate them.
The Noun was divided as follows:
- Geometry trait —> parts
- Body —> accessories, body, pants and shoes
- Head —> head and glasses
By joining the heads and glasses, a problem was generated. There were 234 heads that would need blend shapes. The position of the glasses was specific, so separating the glasses from the heads was not an option.
We have solved this problem below in the "Blend Shapes" section!
With Nouns divided like this, a humanoid rig was made without fingers. The weighting was done and exported in FBX. Then, a scene was prepared in Blender for generation. The rig was made in Maya for convenience.
Blend shapes
As mentioned before, there was a problem with the blend shapes due to the high number of traits: there were 234 heads.
The glasses had the eyes painted in texture. To add more blend shapes and greater expressiveness, I created a pupil by geometry that could move.

To solve the problem with the amount of work involved in making 234 blend shapes, we looked for patterns. Selecting in Maya by Uvs, we isolated the glasses in the viewport.
With the glasses isolated, we grouped those that were in the same height position so that we could work on the blend shapes of all of them at the same time.
Using a clean nomenclature, we create 11 blend shapes:
- Angry
- Fun
- Sad
- Sorrow
- Talk
- Blink_L
- Blink_R
- Look_Up
- Look_Down
- Look_Left
- Look_Right
Once all the blend shapes were molded, they had to be created or, better said, set up the blend shapes.
There are two options here: repeat a process 234 times or automate it. We generated a code to automate this process using the nomenclature for the correct selection and creation of the blend shapes.
For the code, we organized the blend shapes by groups; in each one were the 234 blend shapes of Angry, the 234 of Sad, etc.
The groups are for the code to go through them and select what it needs. If it doesn't find any of them, it can be traced more easily if we divide it as follows.
The code made a list with all names of the main meshes (keywords). The names of the meshes of the 234 heads were extracted with another code that printed them on the console.
Once we created a dictionary to store the geometries for each keyword, we obtained the main head (base mesh), created the blend shapes deformer, and added as a target the rest of the geometries of the dictionary according to the correct name.
The code will do it for each keyword that is in the initial list!
Materials and textures
The original Nouns had another problem: bad optimization of draw calls. You guessed, it had to be optimized. The originals had 5 draw calls and 4 meshes, while the new ones have draw call 1 and 1 mesh.
Nouns did not follow an atlas for their Uvs, so they all overlapped. The solution for these cases is to do texture baking in Blender.
First, before starting the bake, we create all the combinations by joining the accessories and body textures. This way, we created all the texture possibilities for the body, and also allowed us to modify the Uvs of the body by hand so that the hands were in their own region and did not overlap when baking.
For Nouns avatars, this bake process would be performed at the end, once the whole generation process had completed an avatar. See the section of this documentation "Set up of the scene for the generation".
To optimize the quantity of materials and textures, we must:
- Set Blender in cycles and set up the bake options as needed
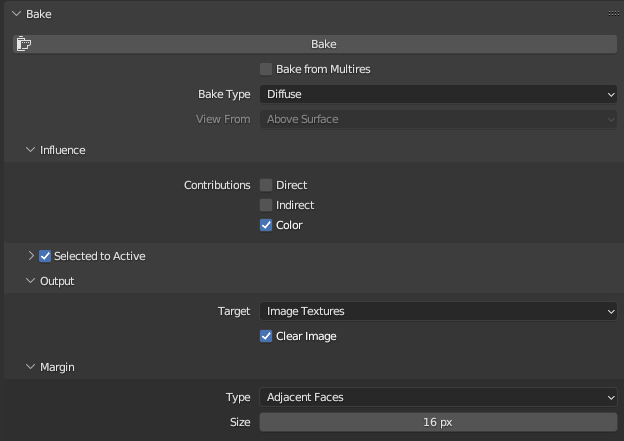
Note: If the baked texture does not look good, it may be due to a wrong setting in "Selected to Active". Try to adjust the values of extrusion and max ray distance until the result is correct.
- Duplicate the created Noun and put the final materials. In this case, only one material with a texture created from Blender.
- Prepare the model to be baked. Nouns do not have the Uvs ordered, so you have to make an unwrap or smart UV project. Configure the options according to your needs for a better result. Sometimes models come with separated vertices due to GLB conversion or other causes, so make sure that the geometry is optimal in order to automatically reposition the Uvs correctly.
- Select the meshes.
- Start the baking process. As a result, we will obtain a texture with all the information contained in the other five.
Set up of the scene for the generation
To prepare the generation scene, we will use Blender. The most important points are:
- Geometry traits are organized in collections, in this case, “head” and “body”.
- All materials must have their textures assigned with a clean nomenclature.
- The generation can be done randomly for new traits or, in this case, following .json file that collects the information of the traits that already exist.
Configuring and exporting the VRM
In order to configure and export VRM in Blender, we will need an add-on. Once we have it installed, if we select the skeleton and go to the "object" menu, we will find "VRM". Inside, we will find all the options to configure.
We will have to configure a skeleton. If we have a shared skeleton, we will only need to configure it once in the generation scene.

The blend shapes are configured below as follow: we must select the mesh and the shape key corresponding to each preset.
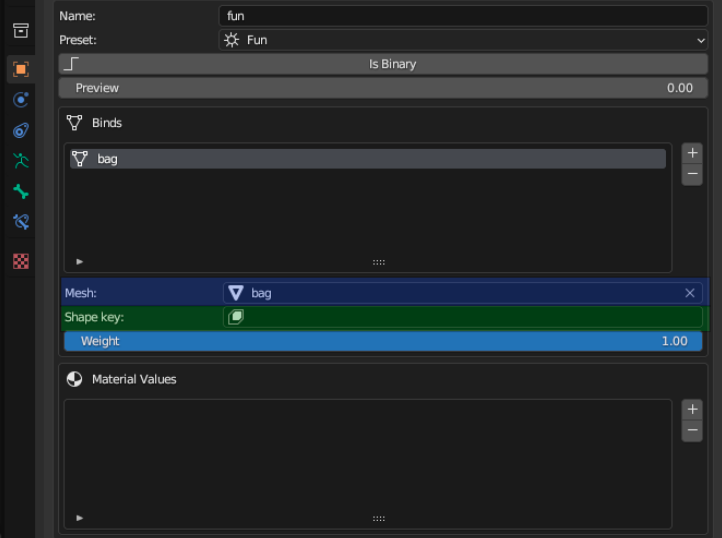
Green: select a shape key in the mesh
Generate new traits
The Nouns are a collection that is updated every day with a new Noun. Some do not have the 3D model of the head and must be made from scratch. To ensure consistency and uniformity across the entire collection, they are created under the same rules.
Process automation as the key of success
The Nouns collection faced technical difficulties due to the number of head traits and the varying positions of the glasses for each head.
However, several important points can be summarized to work with any existing collection that needs optimization and transfer to VRM.
- Clean nomenclature: a clear naming convention helps automate the processes more easily.
- Correct analysis: understanding what we have and what we want to achieve.
- Identify repeated steps: detecting recurring processes in eaach trait allows for automation to streamline the workflow as much as possible.


RelatedUPDATES


