


Rigging a 3D character and solving common problems
How to make a rig and put controlls in Maya and pass the animation to Blender
The mission
Rigging a character is an essential process in 3D modelling and animation, involving the creation of a skeletal structure called a rig. This rig allows us to animate and control the character realistically, resulting a fluid and natural movements for our 3D characters and avatars.
Additionally, rigging saves a significant amount of time in the production of future animations, as the same rig can be reused for different projects.
In this document, we will briefly explain how to create a rig and add controls to it in Autodesk Maya. We'll also cover how to transfer the animation to Blender for rendering and further functional use. Furthermore, we will explore the different constraints and the node editor to understand rigs and their functionalities.
Resources
How to rig in Maya, first steps
When rigging, it's essntial to maintain order and ensure a solid foundation before proceeding to the next step to avoid losing work. To create a bone, you must navigate to "Skeleton > Create Joints" in Autodesk Maya. Then, by clicking on the viewer, you will create the bone.

If the bones appear too small, you can adjust their size in two ways:
- You can adjust the global scale by navigating to "Display > Animation > Joint Size".

- You can change the scale of a specific bone by adjusting its radius property in the "channel box".

To make the bones visible through the mesh, navigate to the top of the viewer and enable "X-Ray Joints" under the "shading" menu.

To create a chain of bones, simply click in the viewport. Each click will create a bone, forming a chain.

To move an isolated bone within a single chain, press "D" and then you can move it. Press "D" again to return to the normal mode.

Always take into account the orientation of the bones to avoid future problems. Tipically, the chain of bones should be linear. If needed, you can modify it by going to "Skeleton > Orient Joint".
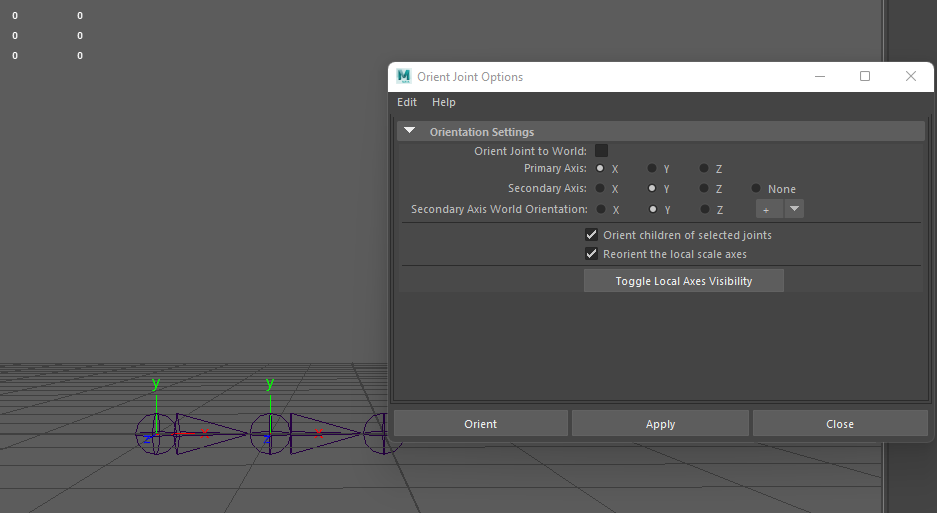
NOTE: pay attention to bone rotations. For a bone to be correct in a generic rig, it must NOT have rotations. The orientation of the bone is the one that must be correct!
Once we have positioned and ensured that the bones are correct, we have to bind the mesh with the bones. To do this, go to "Skin > Bind Skin".

In Bind Mode, we choose how we want the bones to influence the mesh's weight. We can opt for all the bones to act by hierarchy, by the selected ones or by object hierarchy.
In the Bind Method, we have the option to choose between distance, hierarchy, heat map, or voxel. We recommend selecting "Closest distance", as it is the most common choice.

In "Max influences", we can specify the maximum amount of influence we want each bone to have. This can help achieve tighter weighting in some cases and may require fewer adjustments.
Finally, we can choose which deformer to use. For the rig we are discussing, we will always use "Skin Cluster".
For more information about Rigging in Autodesk Maya, clic here!
How to use Paint Skin Weights
To adjust the weights, select "Skin > Paint Skin Weights".

Here we can see the names of the bones that influence the mesh. Below the mode, to paint bones you must always be in Paint.
- Replace: changes the weight of the bone to the value you indicate.
- Add: adds the indicated amount of weight to the existing one.
- Scale: subtracts the indicated amount of weight from the existing one.
- Smooth: smooths the weighting between vertices.
- Flood: used to apply the change to the whole zone or selected zone.
Here you can change the color of the weighting values; it is customizable.

So, with these steps, we can create a basic functional rig for both avatars and other objects. If you have many bones but only want to work on a couple, you can leave them anchored to work more comfortably.

In each vertex, there will always be a value of 1, which means full influence. A vertex can not have less than this. Maya will redistribute this remaining weight among the bones that are close to it or that are not blocked.

The first bone can receive changes in its weighting at the vertices. The second one cannot. Take a look at this visual example!
If we block a bone's influence on certain vertices, its weight value will remain unchanged even if we modify it on another bone. However, if one bone has a weight value of 0.5 and the other bone is free, Maya will distribute the remaining weight (1-0.5=0.5) to the other bone in those vertices.
To select only one area and work on it, choose the vertices. A usefu trick for faster and more controlled selection is to select a vertex or several vertices and press "Shift + >" to select the neighboring vertices, or "<" to deselect the last vertices.
For further documentation on Paint Skin Weights, you can find more info here!
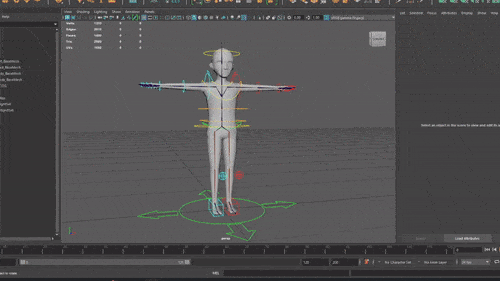
How to put controllers in our rig
When creating the controls and determining how our rig will behave, we have the option to choose between IK (inverse kinematics) or FK (forward kinematics).
- FK: each controller operates according to the hierarchy of parent and child controllers.
- IK: in Maya, there are two types of IK handles. The Handle and the Spline Handle. We will focus on the first one, as the second one is used for specific cases.
To attach bones to a controller, we use constraints. There are many types of constraints, each with numerous options that we need to adjust according to the specific case.
- Parent: creates a link between the translate and rotate values.
- Point: creates a link between the translate values.
- Orient: creates a link between the rotate values.
- Aim: joins rotation but makes the controller the reference point where the bone is directed. For example, for controlling the eyes.
- Pole vector: used in IK to control the direction of joints like knees or elbows.
- Motion paths: provides tools for animating objects along a specified path, useful for creating animations that follow the flow of a curve.

When using a constraint, we'll have an attribute that allows us to activate it (set to 1) or deactivate it (set to 0).

NOTE: when creating a constraint, the order of selection must be: first select the the parent, then the child. The first selected object will have authority over the second one. This will generate a child constraint for the second selected object.

For more information about constraining objects, you can refer to the official documentation or tutorials available here!
How can I create my custom controllers in Maya?
To access the curves menu and use visual shortcuts, navigate to the top bar and select "Curves / Surfaces". This will provide you with more options for creating and modifying curves.

In this example, we have three curves that we want to join into one. We need their shapes to be merged.


To do this:
- We create an empty group.
- Be sure to clear the history and freeze the mesh.
- In the "outliner" tab at the top, select "Display > Shapes".
- Then, select all shapes and the empty group.

- Go to the "mel" bar at the bottom of the screen and type: parent -r -s. Press "enter", and that's it.
In order to understand this part of MEL, we have made a little explanation:
- Parent -r (-relative) is relative positioning. Parent -r will change the object’s parent while leaving the object’s local transform unchanged. If you open the "Edit > Parent" options box, it's the same as the "Preserve position" checkbox.
- Parent -s (-shape) is used to change the parent transform of a shape. So it unifies them in the same transform.

Here you will find more interesting information about MEL!
Return to the display and uncheck "shape". You will now have a single curve transform containing the 3 shapes.


If you want to change the curve color, press "CTR+A" to change the channel box to attribute editor, then go to "Object Display > Drawing Overrides". Check "Enable Overrides" and change the color to RGB.
Finally, choose the color of your choice, for example green. Remember that this only changes the color of one shape.


How to position the controls correctly on the rig
We must take into account that the movement applied to the bone from the controller will be done from a pivot point. To have clean options and to be more comfortable when animating, we should have everything frozen in the correct position.
To start, the controller must be at 0,0,0 and frozen. Relate the controller to the bone by selecting the controller, then the bone, and pressing "P".
Once done, set the controller positions to 0 and unpair with "Shift+P". Reset the controller positions, and now it will be in exactly the same position as the bone, with the pivot point in its correct place.

Note the correct orientation of the controls. The left and right sides cannot have the same direction (or rather, it should not be for convenience).
As the controllers cannot have any variation in their position, rotation and scale while in the initial pose, the solution is simple.
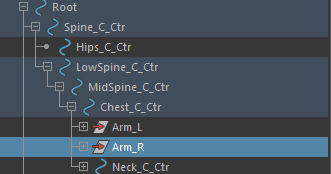
The hierarchy will be in an empty group with pivot at 0,0,0 and within the hierarchy of arm controls, in this case.
In the group, we put -1 in Z so that the orientation of the controllers is correct, thus creating the controls for the opposite part of the rig faster and with correct orientation.

Common problems and how to solve them
How can I copy the weights to another rig?
✅ If the rig (bones and geometry) is the same or shares great similarities with another one you want to make, you don't have to start from scratch. To copy the weights from one geometry to another, simply go to "Skin > Copy Skin Weights". In Influence Association, select One to one.


Select the geometry with the correct weights, then select the one you want to copy them to. Click "Apply", and you're done. If there were some differences, the copied weights will need to be corrected, but only in the areas that have differences, saving you time.
When I make a constraint the bone moves
✅ It may be that the bone has rotations, or that the controller is not in the correct position. If everything is OK and it is happening with an orient, open its settings and press "maintain offset".
If I scale my rig with controllers it breaks down
✅ Being a more complex system, scaling the "root" control is not enough. It is necessary to unify the scale, and for that, create a global scale.
Depending on the complexity of the rig, more or less utility will be needed. For a basic rig, it would be enough to unify the scale of the bones with the "root" controller. For that, create a group with the bones inside and make a constraint scale by selecting the root controller and the group with the skeleton. That should be enough!
Rig Maya to Blender: things to keep in mind
It should be noted that not all connections can be passed from Maya to Blender, but the weighting of the bones and the hierarchy can. To pass an animation to Blender, see this documentation.
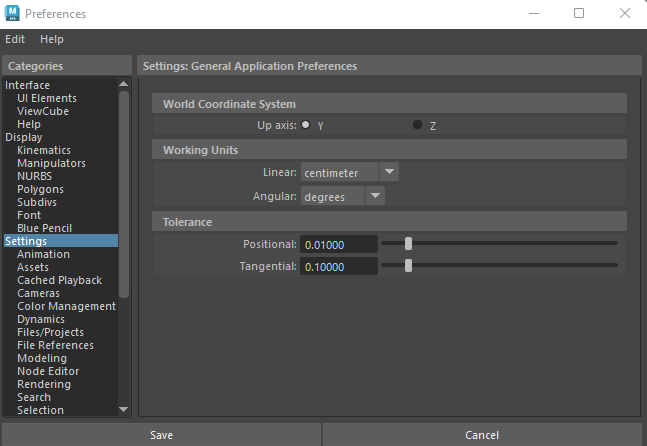
Another issue to keep in mind is that Blender has different axes. The up axis in Maya by default is Y, but in Blender, it is Z.
To avoid possible problems in Maya, you can change from up axis Y to Z. To do this, go to the bottom of the screen and click on the doll with a gear, which will open the "Preferences menu > Settings", and change the option.
Conclusion
To create a good rig, order and cleanliness is essential. Carrying over errors from here can hinder work of animators and limit their potential.
This guide provides a very basic approach to creating a rig with controllers, but it serves as the foundation for scaling up gradually.


